Showing posts with label DIY. Show all posts

Tuesday, April 16, 2013

Twine and felt wreath


I was definitely feeling the late winter/early spring blahs the other day. It is hard to decorate outdoors when the wind is still whipping and it is snowing. I thought I would brighten my front door with a new wreath. All of you know how this girl loves making wreaths, right?

I have seen these wreaths all around and thought I would make my own with a twist. The materials were easy enough, foam wreath, twine, felt and glue gun. I like the twine better than the yarn version because I thought it would make it more durable and rustic.

I attached the twine to the wreath with glue and wrapped the twine all around the wreath until everything was covered. I glued every so often to make sure it stayed attached. After that was completed, I began working on the flowers. I cut circles in various sizes with 6 different colors of felt. Then I just layered the felt until it looked like a cute flower and the color combo was good.

Then glue the flowers on the wreath. You can do as many or as few as you like. There are no rules. I attached another piece of twine to the top to hang the wreath. Soooo simple, and cute! Take that expensive wreaths from the store!


Sunday, April 7, 2013

Broken Makeup Magic


We have all had our favorite makeup fall off the shelf or bust in our makeup bag…and want to cry because that shade of blush or eye shadow doesn’t get made anymore. You think to yourself how can I save my “JUST TO DIE FOR TEAL” shadow? Well I broke my Bare Minerals (If you haven’t tried the new pressed powder DO!!! It’s so much less mess with awesome coverage) compact the other day and well to put it mildly I’m cheap and didn’t want to spend the money on a new one just yet.


Recently on Pinterest I have been seeing how easy it is to fix any broken compact/ shadow/ blush. So I decided I would give it a shot. First I broke down all the already broken pieces into a fine powder. I used the handle of my kabuki brush to do this. Then I added a few drops of alcohol, be sure not to add too much or it will become runny and messy in the next step. I used alcohol because it evaporates and leaves the compact clean where water could produce fungus, causing breakouts. Next I covered the compact with plastic and pressed down with a quarter to flatten and compact the powder back down.


Tada! Now I can carry it my makeup bag again without making a mess and I saved myself from having to pick up a new compact!!

Sunday, March 3, 2013

Monogram Picture Frames

Creative credit: Jennifer Caldwell
Here is a cute and simple way to brighten up your home with some cute decor. These frames are so easy to make. They also make great gifts.

All you need is pretty picture frames ( these came from TJ Maxx), coordinating scrapbook paper, and felt stick on letters. Cut the paper to fit the frame and add your monogram. These three have the last name initial and the two first name initial. Super easy and adorable!

Monday, February 25, 2013

Birthday Candy Bouquet


Need a quick and cute little something for a gift? I made these super cute candy bouquets with supplies all from the Dollar Tree. Woot Woot!


Supplies
 
      • small pot
  • foam floral inserts
  • glue
  • stick on letters
  • colorful paper
  • gift wrapping ribbons
  • candy of your choice
  • popsicle sticks or drink stirrers

For my friends 40th birthday, I made one that says " Birthdays Suck". I put the foam insert in the pot, and added Dum Dums (40 of them) to the foam to form a ball. Then I cut out a circle with decorative paper and stuck the letters and numbers on it to make sign. I then glued the sign on a drink stirrer and inserted it into the foam also. Then I added the ribbons around the pot to decorate.


My nephew is turning 13, which is a big deal since he is an official teenager ( tears!). Of course I couldn't say birthdays suck for him. One because her is young and they really don't suck, and two, he's not allowed to say suck. So, "Birthdays Rock" it is.

I followed the same format as the other bouquet except I used Pop Rocks instead. I glued the Pop Rocks to the drink stirrers, and inserted them in the foam.

Monday, February 11, 2013

Burlap Wreath

Time for me to make a new wreath. I mean, I have to keep up with my wreath a month habit. I admit, I am addicted to making wreaths. They are just so easy to make and can brighten the front door. My door needs to be brightened up right now. I hate when all of the holiday decorations come down. I fee like my porch and front door look naked. So, time to snazz it up.

You will need:

2 yards burlap
1 yard different color burlap
1 wire wreath form
hot glue gun
buttons
ribbons

I started with cutting my main color of burlap in 6 inch by 1 inch strips. Cut a lot of them, it will take them all. Once they were cut, I tied them on to the wire wreath. I went back and forth tying them, making sure to compact them together. You want to be sure that there are no bare spots or holes. Just keep tying until the whole wreath is full. I then went through and cut all of the loose strings off of the burlap. I forgot to mention this is really messy. The burlap makes a crazy mess with all of the strings.


Now to the flowers. I used the different color of burlap. I cut it into 2 inch strips approximately 36 inches long. Plug in your glue gun and get gluing. Fold the burlap in half lengthwise, then begin rolling about 10 times, gluing each roll. After you have your initial roll, begin folding the burlap around the roll. This will make the flower get larger and take on a more flower look versus just a roll. Continue folding and twisting the burlap around the roll, gluing often to secure, until you get to the end. I tried to take pics of the steps but it is hard to show. I also make a flower out of the coordinating ribbon to brighten things up.


Once the flowers were complete, I glued some decorative buttons on a few of them. Now, time to attach the flowers. Figure out where you want your flowers. In that area, I knotted the burlap one more time to make it more of a base. Glue the heck out of the flower and the base and hold it on until it is dry. Continue gluing the others on, making sure to glue the sides so the flowers attach to each other.

Last step is to cut your ribbon. Thread it through the back of the wire wreath and tie a bow at the top. That will be your hanger. Enjoy your wreath. Of course you can do different color combos and accents on it for different seasons.


Monday, February 4, 2013

String Art

 
I keep seeing string art everywhere and I thought I would give it a whirl. It wasn’t hard at all. The most difficult part was getting the map out after I had everything strung together.
First step was to print out a state map. I did Virginia because that’s where we live, (hello)! Then I just followed the outline hammering in tacking nails as straight as possible all the way around. Next, I made a heart shape over Blacksburg area (where I live) NOTE: If I do this project again I would make the heart first then follow the outline around the state…it would make it much easier.
 
After I had all my nails in, I started stringing. I just made a knot and the cut the loose ends off. I wrapped back and forth from the heart to the outer edge. I did ombre colors but you could choose whatever color or colors you wanted. My final step was to pull the map out. I used tweezers to get under the strings and pull the paper out, and then I pained the nail headed for extra pop!
 
So I officially now have string art!
Things Needed:
Wood
Nails
Map
String
Paints
Hammer
Tweezers


Monday, January 28, 2013

Upcycling 1 Sweater, 3 Uses

I know that you have some old sweaters laying around that you have not worn in forever. I sure do. I keep them around thinking that I might wear them one day, but I don't.

If you follow my instagram (click link on left),  you notice that I wear a lot of leggings and boots. Its my fave. I needed a little something something to jazz up an outfit the other day. I have been wanting to crochet some boot cuffs but have been too lazy to make them. So, I did the next best thing. I cut some off a sweater!

I had an old turtleneck sweater just laying around. I cut 1/4 of the sleeves with the cuffs. I just wanted toppers because I sweat way to much for them on my whole leg. That was easy, but what to do with the rest of the sweater? I could not waste it! I decided to cut off the neck off to make a cute cowl neck scarf. It is loose enough to wear for fashion and also warm.

I still basically had the rest of the sweater left. It looked kind of cute cut up. Like an off the shoulder sweater. But it was frayed around the parts we cut off and didn't look too great. I decided to make a cute slipcover for a pillow. It was super easy. I just cut the front and back into squares, flipped it inside out, and sewed it up.

I would definitely say that was upcycling at its best!


Tuesday, January 22, 2013

Zebra Rocking Horse

 
 This was Candice's nephews first Christmas, so she wanted to give him something special just from her that she made. She went to Michaels and picked up a non-finished rocking horse. They usually run about $30 but one of the things that is best about shopping there is that they always have coupons, so it was $15. Woot Woot! 
 
 Then she had the vision of having it look like a zebra but with a twist. No black and white Zebra for him, so she picked up off white spray paint and light and dark blue acrylic paints. 

 Start off  by spray painting the entire thing , taking extra care to get every side and angle. Then wait a few days to make sure the wood is good and dry. Next is time to hand paint the zebra stripes…..
 
 These don’t need to be the same on both sides because we all know that no two zebras stripes are the same! The final step is to paint over the muzzle and tail with the dark blue.  The painting of the eye was for me the most difficult but it turned out pretty well. What do you all think?
Things needed:
-
Rocking Horse
-
Spray Paint
-
Acrylic Paint
-
Paint Brushes


Sunday, January 6, 2013

Burlap Planter

Looking for something cute to jazz up your front porch? I was so I decided to get my crafty pants on and do something different. I came up with this super cute burlap tub that can change with the seasons.

Materials needed:

Galvanized steel tub from your local farm supply store, different sizes
Burlap material from fabric store
Stencils
Paint
Glue Gun
Whatever decoration you want in your tub

First step is to cut the burlap to the appropriate length and width to wrap around the tub. Then I place the stencil I want to use on the burlap and paint. After the paint has dried, I attach it to the planter with the glue gun. And.... that's it. Not too difficult.

Since it was winter, I filled it with pine cones. You can change it our with the seasons. Leaves in the fall, grass and eggs for the spring, etc. Super quick and easy décor!


Thursday, December 27, 2012

Pinterest- Nailed it or Failed it?

Here is my attempt at something I have seen on Pinterest and attempt to make it. We will see if it is as easy as they say it is. I saw this DIY ruffled scarf and knew I had to try it. It is so cute!

I was anxious at first because it requires the sewing machine and I hate my sewing machine. Well, I hate it because 1. I have no patience 2. I taught myself how to use it so technically I am sure I am not doing it right 3. I hate having to get it out and setting it up because I am lazy.

So, I decided to try to be positive about the whole thing and try it. It was going rather smoothly until my bobbin ran out of thread which really ticked me off. I was doing good, trying not cuss until that happened...

Here is a pic of how it was supposed to look.

 
And here is mine...


Not as ruffled as the original but not too bad. I think it might have had something to do with the material I used.  
 
 
Here is the link with the directions
http://www.pinklemonade-blog.com/2011/09/ruffle-scarf-tutorial.html

I would have to say Pinterest- Failed it, because of my lack of ruffles :(


Tuesday, December 18, 2012

Turn That Frown Upside Down


Winter weather causing your lips to chap, crack and dry out? Well it’s your lucky day because I have a great little DIY lip scrub that will gently work away that dry peeling skin and leave your lips feeling smooth and voluptuous!  Best yet, you won’t even have to go to the store! I had everything I needed right in my kitchen.

Materials:

- 1 tbsp Sugar- white or brown (the more course the grains,the more it’s going to exfoliate)
-1tsp Oil (I used Extra Virgin, but you can use what you have)
- Small dab of honey


To mix: Put sugar in a small bowl then add the oil a little at a time to coat all the sugar evenly. The honey acts as the binder so I added just a small squirt and mixed it all together. It works wonders my lips feel great!!!


Saturday, December 15, 2012

Christmas Ornament Party

Candice had her annual ornament painting party with all of our work peeps. She always has some great ideas on what to make each year. This year it was painting light bulbs. I, unfortunately was not the best at painting. I lack the patience. But, everyone else did a great job. So I thought I would share some of our photos of the good time we had.


Oh, and we even had some carolers come by during the party. How awesome is that?

Friday, December 14, 2012

$8 $8 Read All About It


I wanted to do something budget friendly this year and I needed a holiday wreath. Btw, have you looked at the price of those? The cheapest one I could find was $30. I thought, I could make something cute under $10….

So I check my wallet...score! I had a 50% off coupon for Michael’s Crafts so I stopped there first and snagged my wreath with my coupon it can to a big whopping $2 bucks!!!

Then I headed for the Dollar Tree. I think people tend to write them off, but I have done some wonderful party centerpieces from Dollar Tree items (I’ll save those for another blog) While I was there I picked up come awesome swirly candy cane stakes and red and white ball stakes…. I didn’t have a theme but one just kind of fell into my lap. They had an assortment of ribbon so I found one I liked and a Santa head ornament. It was larger then most so I thought it would look great  front and center.  Grand total of $6 at the Dollar Tree!

It was easy to put together. I cut the stakes to size, one on each side and glued it in place. Then I put Santa in the middle and glued the ribbon around….
Tada! Super Cute and Super Cheap!


Monday, December 10, 2012

Anything A Spider Can Shoe?!?!


This is such an easy idea it only takes a few materials a little time and patience. I’m a huge fan of The Big Bang Theory and I have become a bit of a nerd…. No really. We are talking comic books, bad movies, and cartoons. So I decide to dress up a pair of old flats I had laying around the house in honor of TBBT (you could do this with heels too)

Materials needed:
-          ModPodge (Found at any local craft store)
-          Comic Book (I used Spiderman)
-          Scissors
-          Shoes


The first thing I did was cut out all the scenes from the comic book, you will have to trim them down to fit the shoe when you ModPodge it on. Then I coated a small section of my shoe with ModPodge and placed my comic cut out on it. Re coating the cutouts with ModPodge I worked my way around covering the face of the shoe only that will be seen when I’m walking.

Making sure I’m trimming the comic strips as I’m working is much easier than going back and doing it later. Once I have the whole shoe completed, recover everything with ModPodge and let dry 24 hours. Reapply another coat of ModPodge, repeat this once step once last lime let it dry and reapplying a final time….. Then we are done!!!!


Monday, December 3, 2012

Christmas Decor

We have been getting a little crazy with all of our Christmas crafts here in the VA. It is much more fun to do it yourself rather than spending way too much money on premade decorations.

So, a few to share today. I made this wreath today with just a few things from Michael's. I bought a plain garland wreath, one poinsettia, a few glittery pine cones, and some glitter leaves. I just wove the ends into the wreath and done. Could it be any simpler? Nope. Plus it was all under $12 because it was all on sale. Take that Michael's and your $40 premade wreaths!

The next DIY is another topiary! Surprised? Dont be. We love the topiaries here. They are super cute and there are so many creative ways to decorate them.

This topiary comes from our BFF Jen. Yay! There is a pic of her with Candice and I on our homepage. Now you know who she is. She made this awesome topiary with ornaments. All you need is a cardboard cone, small ornaments and glue. Yup, basically 3 things. Just glue your ornaments to the cone to cover all of the carboard and bam! You are done! What do you think?


And.... this is one I made last year. I had some fringe trim hanging around so I glued it around my topiary.
Oh, the possiblilites are endless. Lol.


Now its your turn! Send me pics of ways you have decorated your cones/topiaries. I will add them to the collection! Cant wait to see what you have done!


Sunday, December 2, 2012

Medusa Who?


So I was thinking the other day I really want to try something new with my hair but I don’t want to get up early to do it. I decided to try Curlformers. You sleep on them, get up and take them out in the morning. You can buy these at Sally’s Beauty Supply or online.

For those of you that have never seen Curlformers they are flat spiral rollers that use a tool to pull your hair though them to form spiral curls. Easy peasy right?

I think using Curlformers on someone else would be easier then using them on yourself.
That being said, after I did half my head I started to get the hang of it so with practice I think it would get easier.
You also want to make sure not to pull too much hair at once because that becomes painful. I found the smaller sections that  I took the smoother it was to pull though and the less it hurt.

I give Curlformers Simplicity a C, and Finished results  a B+

Wednesday, November 28, 2012

Yarn Wreath

Yarn Wreath

Things needed:
Scissors
Hot glue Gun and Glue
Red and White Yarn
Wooden Snowflake
White Paint
Glitter
Red & White Pearl stakes
Foam Wreath


How To:

Start by gluing the ends both the red and white yarn to back of foam wreath base, alternate wrapping colors around foam. This will make it look like a peppermint, once you have the whole wreath covered cut, tuck and glue ends…. try and hide ends under wrapping.

Now comes the fun part! Paint the snowflake white and cover in glitter. The glitter will stick to the wet paint. I chose a wooden snowflake because I already had paint and glitter at home to help cut cost. You could also use an ornament or pre-painted snowflake.

Now I attached my twigs of red and white pearls I pushed them into the foam and hot glued them into place. (If a little glue shows its ok your snowflake will help hide it)

Now once you have those in place your snowflake should be dry and ready to glue. Just glue in place at the base where the stakes meet the wreath to help hide any glue and make everything look finished…Tada!!!

Friday, November 23, 2012

Pinterest Vest- Nailed it!

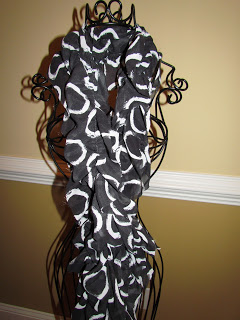
So, as you know there are so many DIY items on Pinterest. Everything looks so easy and crafty. I thought that I would make this super cute and easy scarf.

Here is the link for the original pin with directions


Here is what it was supposed to look like


And here is the finished product!


This is definitely a Pinterest- Nailed it DIY!

Plus I got tons and tons of compliments on it. Yay me!


Monday, November 19, 2012

Sequin Christmas Trees

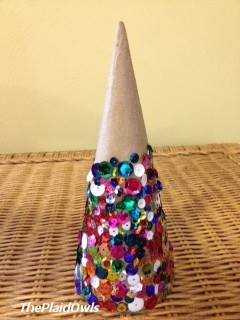
Here is an easy and cheap way to decorate for the holiday! It is also AWESOME! But thats just a sidenote. Anyway, all you need are a few supplies.
  • Cardboard cones from Michaels
  • Box of multi colored sequins
  • All purpose glue
Thats it!


Next put some glue on the cones, and apply sequins. Told you it was easy! Tedious but easy. I just used the different sizes and colors of the sequins and randomly glued them on. After I let the glue set, I went back and added sequins to any bare spots that I saw.


 Ta Da! Easy Christmas decorations! You can thank me later!