Thursday, December 27, 2012

Pinterest- Nailed it or Failed it?

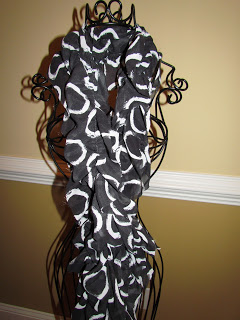
Here is my attempt at something I have seen on Pinterest and attempt to make it. We will see if it is as easy as they say it is. I saw this DIY ruffled scarf and knew I had to try it. It is so cute!

I was anxious at first because it requires the sewing machine and I hate my sewing machine. Well, I hate it because 1. I have no patience 2. I taught myself how to use it so technically I am sure I am not doing it right 3. I hate having to get it out and setting it up because I am lazy.

So, I decided to try to be positive about the whole thing and try it. It was going rather smoothly until my bobbin ran out of thread which really ticked me off. I was doing good, trying not cuss until that happened...

Here is a pic of how it was supposed to look.

 
And here is mine...


Not as ruffled as the original but not too bad. I think it might have had something to do with the material I used.  
 
 
Here is the link with the directions
http://www.pinklemonade-blog.com/2011/09/ruffle-scarf-tutorial.html

I would have to say Pinterest- Failed it, because of my lack of ruffles :(


Sunday, December 23, 2012

Pinterest- Nailed it of Failed it?

Here is another Pinterest- Nailed it of Failed it project!

I will take a project, recipe, or idea from Pinterest, my most favorite site out there, and do it myself, see if it works or turns out like it is supposed to in the picture. This should be fun!

I found this pin for Flourless Chocolate Brownie Cookies, they looked delish so I had to try them. I mean, they are good for you and healthy if they don't have flour in them, right?

Here is the easy recipe and the original link:
http://creativekitchenadventures.com/


Ingredients
  • 3 cups powdered sugar
  • 2/3 cup unsweetened Dutch-processed cocoa powder
  • 1/4 tsp sea salt
  • 3 large egg whites, at room temperature
  • 1 Tbsp pure vanilla extract
  • 2 cups semi-sweet chocolate chips
Instructions
  1. Preheat oven to 350.
  2. In a large bowl, mix together powdered sugar, cocoa powder and sea salt. Add in vanilla. Whisk in egg whites until just moistened. Add in chocolate chips.
  3. Spoon thick fudgy batter onto cookie sheets in small mounds. Chill for 5 or so minutes to keep them from spreading when they bake.
  4. Bake for 14 minutes or until tops are glossy and lightly cracked.
Super easy, right? They look kind of gross when you put them on the cookie sheet, I wont lie. But they are so good!
 
Mine did not look as perfect as the ones on Pinterest, but they tasted awesome!
 
Defiantly a Pinterest Nailed It!
 
Original Photo of Cookies (the goal)

And my cookies, kind of the same?


Tuesday, December 18, 2012

Turn That Frown Upside Down


Winter weather causing your lips to chap, crack and dry out? Well it’s your lucky day because I have a great little DIY lip scrub that will gently work away that dry peeling skin and leave your lips feeling smooth and voluptuous!  Best yet, you won’t even have to go to the store! I had everything I needed right in my kitchen.

Materials:

- 1 tbsp Sugar- white or brown (the more course the grains,the more it’s going to exfoliate)
-1tsp Oil (I used Extra Virgin, but you can use what you have)
- Small dab of honey


To mix: Put sugar in a small bowl then add the oil a little at a time to coat all the sugar evenly. The honey acts as the binder so I added just a small squirt and mixed it all together. It works wonders my lips feel great!!!


Saturday, December 15, 2012

Christmas Ornament Party

Candice had her annual ornament painting party with all of our work peeps. She always has some great ideas on what to make each year. This year it was painting light bulbs. I, unfortunately was not the best at painting. I lack the patience. But, everyone else did a great job. So I thought I would share some of our photos of the good time we had.


Oh, and we even had some carolers come by during the party. How awesome is that?

Friday, December 14, 2012

$8 $8 Read All About It


I wanted to do something budget friendly this year and I needed a holiday wreath. Btw, have you looked at the price of those? The cheapest one I could find was $30. I thought, I could make something cute under $10….

So I check my wallet...score! I had a 50% off coupon for Michael’s Crafts so I stopped there first and snagged my wreath with my coupon it can to a big whopping $2 bucks!!!

Then I headed for the Dollar Tree. I think people tend to write them off, but I have done some wonderful party centerpieces from Dollar Tree items (I’ll save those for another blog) While I was there I picked up come awesome swirly candy cane stakes and red and white ball stakes…. I didn’t have a theme but one just kind of fell into my lap. They had an assortment of ribbon so I found one I liked and a Santa head ornament. It was larger then most so I thought it would look great  front and center.  Grand total of $6 at the Dollar Tree!

It was easy to put together. I cut the stakes to size, one on each side and glued it in place. Then I put Santa in the middle and glued the ribbon around….
Tada! Super Cute and Super Cheap!


Monday, December 10, 2012

Anything A Spider Can Shoe?!?!


This is such an easy idea it only takes a few materials a little time and patience. I’m a huge fan of The Big Bang Theory and I have become a bit of a nerd…. No really. We are talking comic books, bad movies, and cartoons. So I decide to dress up a pair of old flats I had laying around the house in honor of TBBT (you could do this with heels too)

Materials needed:
-          ModPodge (Found at any local craft store)
-          Comic Book (I used Spiderman)
-          Scissors
-          Shoes


The first thing I did was cut out all the scenes from the comic book, you will have to trim them down to fit the shoe when you ModPodge it on. Then I coated a small section of my shoe with ModPodge and placed my comic cut out on it. Re coating the cutouts with ModPodge I worked my way around covering the face of the shoe only that will be seen when I’m walking.

Making sure I’m trimming the comic strips as I’m working is much easier than going back and doing it later. Once I have the whole shoe completed, recover everything with ModPodge and let dry 24 hours. Reapply another coat of ModPodge, repeat this once step once last lime let it dry and reapplying a final time….. Then we are done!!!!


Monday, December 3, 2012

Christmas Decor

We have been getting a little crazy with all of our Christmas crafts here in the VA. It is much more fun to do it yourself rather than spending way too much money on premade decorations.

So, a few to share today. I made this wreath today with just a few things from Michael's. I bought a plain garland wreath, one poinsettia, a few glittery pine cones, and some glitter leaves. I just wove the ends into the wreath and done. Could it be any simpler? Nope. Plus it was all under $12 because it was all on sale. Take that Michael's and your $40 premade wreaths!

The next DIY is another topiary! Surprised? Dont be. We love the topiaries here. They are super cute and there are so many creative ways to decorate them.

This topiary comes from our BFF Jen. Yay! There is a pic of her with Candice and I on our homepage. Now you know who she is. She made this awesome topiary with ornaments. All you need is a cardboard cone, small ornaments and glue. Yup, basically 3 things. Just glue your ornaments to the cone to cover all of the carboard and bam! You are done! What do you think?


And.... this is one I made last year. I had some fringe trim hanging around so I glued it around my topiary.
Oh, the possiblilites are endless. Lol.


Now its your turn! Send me pics of ways you have decorated your cones/topiaries. I will add them to the collection! Cant wait to see what you have done!


Sunday, December 2, 2012

Medusa Who?


So I was thinking the other day I really want to try something new with my hair but I don’t want to get up early to do it. I decided to try Curlformers. You sleep on them, get up and take them out in the morning. You can buy these at Sally’s Beauty Supply or online.

For those of you that have never seen Curlformers they are flat spiral rollers that use a tool to pull your hair though them to form spiral curls. Easy peasy right?

I think using Curlformers on someone else would be easier then using them on yourself.
That being said, after I did half my head I started to get the hang of it so with practice I think it would get easier.
You also want to make sure not to pull too much hair at once because that becomes painful. I found the smaller sections that  I took the smoother it was to pull though and the less it hurt.

I give Curlformers Simplicity a C, and Finished results  a B+

Wednesday, November 28, 2012

Yarn Wreath

Yarn Wreath

Things needed:
Scissors
Hot glue Gun and Glue
Red and White Yarn
Wooden Snowflake
White Paint
Glitter
Red & White Pearl stakes
Foam Wreath


How To:

Start by gluing the ends both the red and white yarn to back of foam wreath base, alternate wrapping colors around foam. This will make it look like a peppermint, once you have the whole wreath covered cut, tuck and glue ends…. try and hide ends under wrapping.

Now comes the fun part! Paint the snowflake white and cover in glitter. The glitter will stick to the wet paint. I chose a wooden snowflake because I already had paint and glitter at home to help cut cost. You could also use an ornament or pre-painted snowflake.

Now I attached my twigs of red and white pearls I pushed them into the foam and hot glued them into place. (If a little glue shows its ok your snowflake will help hide it)

Now once you have those in place your snowflake should be dry and ready to glue. Just glue in place at the base where the stakes meet the wreath to help hide any glue and make everything look finished…Tada!!!

Friday, November 23, 2012

Pinterest Vest- Nailed it!

So, as you know there are so many DIY items on Pinterest. Everything looks so easy and crafty. I thought that I would make this super cute and easy scarf.

Here is the link for the original pin with directions


Here is what it was supposed to look like


And here is the finished product!


This is definitely a Pinterest- Nailed it DIY!

Plus I got tons and tons of compliments on it. Yay me!


Monday, November 19, 2012

Sequin Christmas Trees

Here is an easy and cheap way to decorate for the holiday! It is also AWESOME! But thats just a sidenote. Anyway, all you need are a few supplies.
  • Cardboard cones from Michaels
  • Box of multi colored sequins
  • All purpose glue
Thats it!


Next put some glue on the cones, and apply sequins. Told you it was easy! Tedious but easy. I just used the different sizes and colors of the sequins and randomly glued them on. After I let the glue set, I went back and added sequins to any bare spots that I saw.


 Ta Da! Easy Christmas decorations! You can thank me later!


Friday, November 16, 2012

Gameday Fashion

So, here in the South, we girls take fashion very seriously. Especially on game day! I have been to many football games all over, but of course my favorite is Lane Stadium watching the Virginia Tech Hokies! Living here in Blacksburg, game day is a tradition and a pretty big event. I love the energy and buzz that comes along with it.

What to wear on game day is a big deal. I have noticed that girls in the South take Football and tailgating seriously. Apparently here at VT we are a little more relaxed with our style. Compared to other schools where girls bust out their dresses and pearls. Not to leave the guys out, they represent as well. Most guys who go to the Hokie games wear t-shirts and shorts or jerseys. At some other schools, they guys are dressed to the nines. I am talking seersucker pants, bow ties, and a jacket. Pretty snazzy.

Since we are in the midst of college football season, I thought it would be fitting to talk about this topic. There are a few rules to follow:

·         You must wear your team colors. This is a must. You have to show what team you are for. It is acceptable to be dressed head to toe in your teams colors.

·         You can never have too much flair and accessories. There is no such thing as too much. It is ok to wear team earrings, necklace, scarf, belt, knee socks, leg warmers, head bands, etc.

·         It is important to bring a change of clothes. You must stay fresh! There are proper clothes for the tailgate and then the game. You can wear a skirt and sandals for the tailgate and change into jeans and a jacket for the game. It is good to have options. 

·         It is ok for girls to wear football jerseys, it is actually cute. It is also ok to cut up a t-shirt to make it more stylish. Cut out the neck to make it off the shoulder, cut up the sides, etc. Show your fashion sense with your team colors.

I thought I would show some pics of my game day style. Remember that I am older so I can’t wear some of the clothes the young girls can wear. I’m also posting some pics of other school styles. My personal favorites for game day fashion are a jersey or tank top and shorts or skirt in the warmer months. When it gets colder out, I go for the jeans tucked into the boots and a sweater with a scarf. That’s how we roll down her in the VA!

Check out our pinterest page. I have a board with various fashion styles for different schools.

Here are some pretty cool websites I found for game day help!


Wednesday, November 14, 2012

Easy Christmas Cookie Jar


So I always try and give everyone I work with a little something for Christmas, but that can start to get a little pricey. Well why not make them cookies? Don’t have the time??? That’s ok, these great jars have everything they need to make delicious cookies at home. It takes no time to make and the idea is super cute!!

(Tag Reads)

M&M Cookies
¾ cup butter or margarine, softened
1 egg
1 tsp. vanilla


Preheat oven to 350, empty jar into large bowl mix well. Using hands mix in butter until well blended. Beat together the egg and vanilla then add to batter. Dough will be a little crumbly…. shape into 1 inch balls and place on baking sheet 2 inches apart. Bake for 10-14 min.


( Jar)


    1/2 cup sugar
    1/2 cup packed light brown sugar
    2 cups regular all-purpose flour
    1/2 tsp baking soda
    1/8 tsp salt
    12-ounce package of M&Ms


Monday, November 12, 2012

Oh Summer Glow???


Missing that summer glow? I know I am. Winter is a great time to have rosy cheeks but you can still give yourself a golden glow even in the winter. It’s not tanning season so you don’t want to look over done or washed out. But giving yourself a little color can help make you feel more awake and refreshed…..better about the day!! Here’s my homemade solution for all you suffering without your summertime tan.

Mix your Moisturizer with powered bronze or gold powder eye shadow (darker the shadow darker the glow) I mixed mine 3:1   3 parts moisturizer 1 part shadow

What do you think?
Creamy texture, awesome glow I added to my cheeks over my blush! LOVE!!!


Easy Winter Brown Sugar Scrub


It’s that time of year again, cold weather is upon us!! If any of you are like me, then I’m sure that your hands and feet are suffering from dry skin. Nothing is worse then walking around feeling like an alligator; well I have the perfect cure fore those winter blues.  It also makes a really cute Christmas gift!!! Put it in a jar dress it up, and it’s a wonderful gift for your co-works and friends!  The best part you probably have everything you need in your pantry.  It smells great and your hands and feet will love you!! (For extra fragrance add a few drops of your favorite essential oil to the mix)

     Half cup brown sugar
     Three tablespoons olive oil
     H2O (Just a bit)
     Essential Oil ** (Optional)


Shellac Attack


Tired of dull chipped looking nails? Me too, every time I paint my nails it lasts a total of 3 hours before it has started peeling or chipping. So I decided to give CND Shellac a go.  I can’t believe the results these pictures are taken on day five and my nails are still shiny and damage free.  Shellac has a 14-day wear time, mirror finish and (my favorite) zero dry time!! Shellac is a polish that wears like a gel, it can be removed in minutes and it’s non-damaging! I give Shellac an A!!!!